DIY Craftsman Style Door Casing
RENOVATION IDEASHOW TO GUIDELIVING ROOM


How to Design and Install Craftsman-Style Door Casing: A Complete DIY Guide
Adding Craftsman-style casing to your interior doors is an easy way to bring timeless elegance and a touch of craftsmanship into your home. The clean lines and well-defined edges of Craftsman trim create a polished look, elevating the overall aesthetic of your space. Whether you're redesigning one door or tackling multiple, this step-by-step guide will walk you through how to design, build, and install Craftsman-style door trim with ease.
Materials & Tools You’ll Need:
Trim Boards (MDF, wood, or PVC)
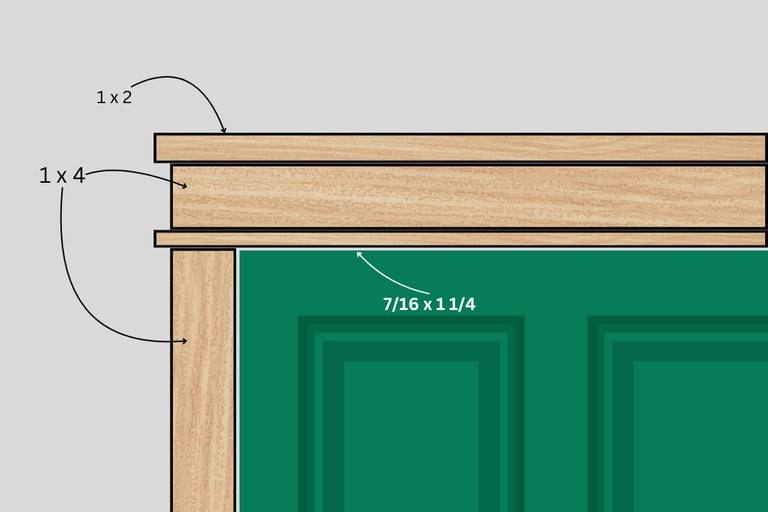
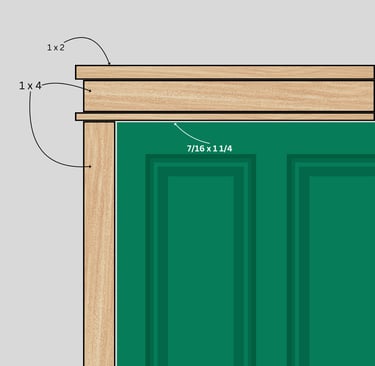
1×4 Boards (for sides and top)
Smaller Trim Pieces (for accentuating the top, according to your design)
1x2
7/16 X 1 1/4 (some use quarter round)
Finishing Nail Gun
Wood Glue
Wood Filler
2-3 Clamps
Paint (Ultra Pure White semi-gloss, or your preferred color)
Caulk
Painter’s Tape
Sandpaper
Measuring Tape
Miter Saw
Level
Step 1: Design Your Casing
The first thing you'll need to do is design your Craftsman-style trim. Begin by deciding how wide you want the trim to be and whether you’ll use MDF or real wood. MDF is a budget-friendly choice, while real wood adds a bit more character, especially in places like the bathroom. To start, head to your local hardware store (like Home Depot) to pick up the trim boards in different sizes.
Head Casing: The top trim should be slightly wider than the side trim. This helps give the trim a more finished, defined look. You can experiment with different combinations of trim pieces above the door to find the right visual balance for your space.
Side Casing: 1×4 boards work well for the side pieces, and the dimensions can be flexible. You’ll want the side trim to complement the width of the top trim.
Tip: Don’t worry about having an exact formula for the dimensions; it’s all about how the pieces work together to create a harmonious look.
Step 2: Measure and Prepare Your Door Frame
Before you begin cutting your trim, make sure your door frame is ready for the new look. Consider whether you have enough space above the door if you’re adding a taller trim. Once you’re sure the space works, measure the dimensions of your doorframe to determine the lengths of trim you need.
Step 3: Cut and Prepare Your Trim Pieces
Using your miter saw, cut the trim pieces to the appropriate lengths for both the top and sides of the door frame. If you want to create the “header” (the portion of the trim above the door), assemble it first on the ground before installation. You can nail the pieces together to form the header and then paint them before attaching them to the wall.
Tip: It’s always easier to paint trim pieces before installation, especially if you have young children or other distractions in your home. You can always do touch-ups once everything is installed.
Step 4: Create the Head Casing
The head casing is the portion of trim that goes above the door frame. While it may not be standard, it’s a key feature of Craftsman-style trim and gives a more finished appearance. Create the head casing by stacking your trim pieces together as shown in the image. Apply wood glue between casing components and secure together using 2-3 clamps. Lastly securing them together with a finishing nailer. After assembling the header, paint it (and any other trim pieces you’ve prepped) in Ultra Pure White semi-gloss paint or your choice of trim paint.
Step 5: Install the Casing
Once all your pieces are ready, it's time to install the trim. Start by attaching the top trim and then move on to the side pieces. Make sure everything is level, and if needed, adjust the trim pieces slightly until everything looks aligned.
If you're installing the header, simply attach it after the side pieces are in place. Use a nail gun to secure it firmly to the wall. Remember to leave a small offset near the hinges of the door to avoid the casing interfering with the door's function.
Step 6: Addressing Hinges and Strike Plates
A common issue when installing casing is accommodating for the hinges and strike plates. With the Craftsman-style, you may notice the casing sits slightly away from the door frame. This is done to avoid notching the casing around the hinges. While the casing may offset slightly, it is critical to maintaining the doors ability to still open and close properly.
Tip: If the latch slightly scrapes the trim, you can use an extended strike plate to cover the trim and prevent paint from getting scraped.
Step 7: Finish the Installation
Once the casing is installed, it’s time for the finishing touches. Use wood filler to fill in the nail holes, then lightly sand the areas smooth. After sanding, touch up the painted areas so everything looks seamless. If necessary, run caulk along the edges where the trim meets the wall for a cleaner, polished look.
Step 8: Final Touches and Clean Up
After you’ve installed the casing and filled any holes, take a step back and assess the final product. You may want to do some last-minute touch-ups with paint, especially in places that may have gotten scuffed during installation. Clean up any excess caulk or wood filler, and be sure everything is aligned neatly.
Conclusion
The final result? A beautiful Craftsman-style door casing that adds both functionality and style to your space. This casing works well with Craftsman doors but also pairs beautifully with other door styles for a more contemporary or traditional look.
Cost Breakdown:
While costs can vary, the total price of this project comes out to about $75 per door using MDF for cost effectiveness. This includes includes full-length trim boards and paint. Since this is a project best suited for multiple doors, you’ll likely invest in trim for more than one door, making the cost more economical as you complete each one.
Pro Tip:
If you’re doing this project in multiple rooms or for several doors, consider buying materials in bulk to reduce costs.
If the door is located in area where it could be exposed to water, consider using PVC trim for is moisture resistance.
Pick up scrap pieces of wood from your local hardware store and experiment with the pieces and dimensions until you get a look that feels just right for your space.
Adding Craftsman-style casing is an affordable way to improve the aesthetic of your doors while adding a touch of handmade charm. With a little patience and the right materials, you’ll have a finished look that’s both elegant and functional.