
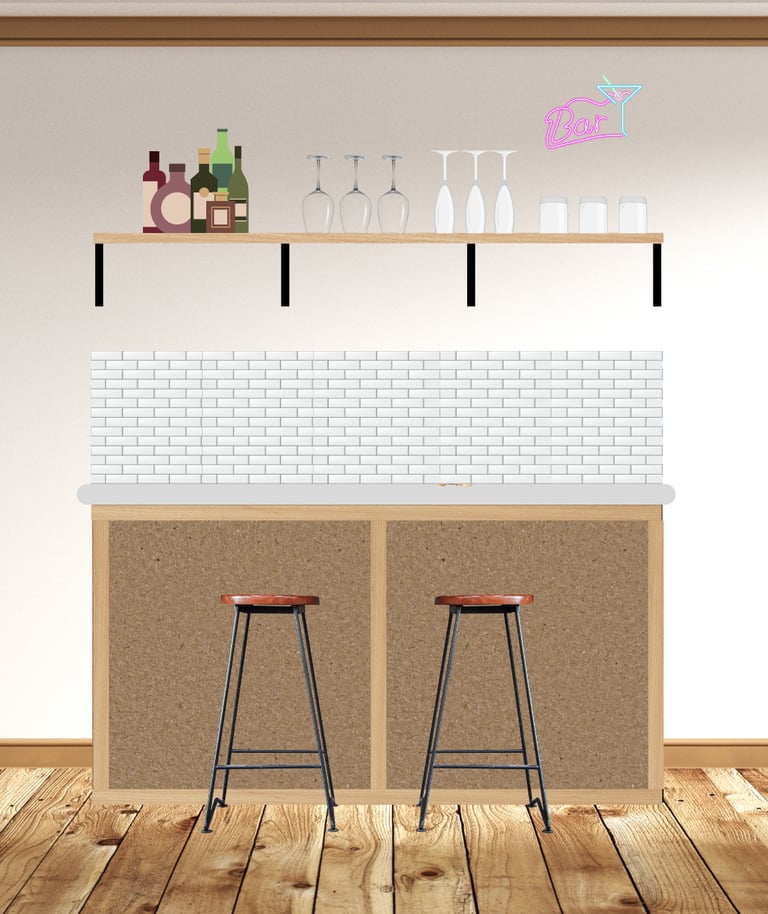
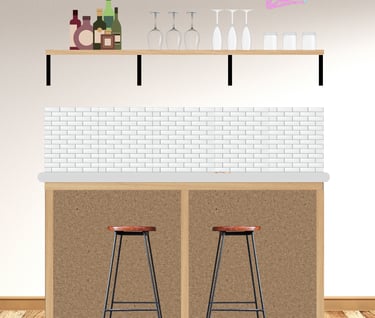
Basement Bar DIY
RENOVATION IDEASBASEMENT
"The key is to start with the bar top, that is often the most expensive part of a home bar."
How to DIY Build a Budget-Friendly Basement Bar for $500 or Less
Dreaming of having your own home bar but don’t want to spend thousands? With some creativity, repurposed materials, and DIY skills, you can build a stylish basement bar for under $500. Follow this step-by-step guide to create a functional and attractive bar without breaking the bank.
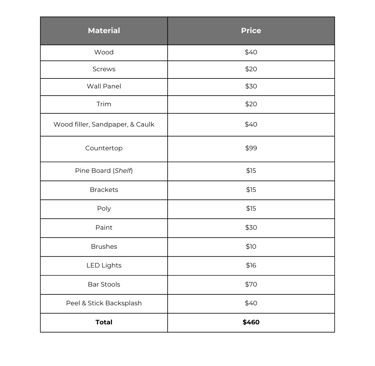
Materials (Approximate Costs)
2x4s for framing – $30–$50
Plywood, MDF, or Wall Board for the bar structure – $50–$100
Reclaimed or laminate countertop – $50–$100
Brackets and pine for floating shelf – $30-$40
Bar stools (used or DIY benches) – $50–$100
Peel-and-stick backsplash or contact paper for aesthetics – $20–$40
LED strip lights for ambiance – $20–$40
Paint & Poly – $30–$40
Wood filler, wood glue, sandpaper, and caulk – $30–$40
Tools
Drill & Impact Driver
Saw (circular or hand saw)
Tape measure & level
Paintbrush or roller
Paint tray
Sander (optional)
Plan Your Basement Bar Design
Before jumping in, the key to budget building is setting up your budget. Size and layout do matter, but consider where you want to put the bulk of your money. You'll also need to consider what materials you already have laying around or whether you have friends or family with tools you can borrow. So before cutting the first piece of wood for your basement bar, decide on:
Size – Keep it compact (4 to 6 feet wide) to stay within budget.
Layout – Will it be against a wall or a freestanding island-style bar?
Storage – Plan for shelving or built-in cubbies for bottles and glasses. (And remember, these are things you can add later if your want to stay on budget)
Style – Rustic, modern, or industrial? Choose materials accordingly.
Pro Tip:
➡️ Start by finding your bar top, this is often the most expensive item. Search Facebook Marketplace or the clearance sections of your nearby big box home improvement store where they often have discounted laminate countertops. We found an in-stock precut laminate countertop at Menards for $99, and we paid full price!
Step 2: Build the Basement Bar Frame
Cut and assemble the frame (Download a detailed 6' freestanding bar assembly here!)
Cut 2x4s to size for the base and vertical supports. A simple rectangle frame is ideal.
Assemble the frame using screws and a drill, ensuring it’s sturdy and level.
Attach plywood or MDF wall panels to the front and sides with screws or nails.
Sand the edges for a smooth finish.
Pro Tip:
➡️ Use repurposed wood or old furniture for cost savings.
Step 3: Install the Bar Top
If you were able to purchase a discount countertop, simply secure it to your base using screws from underneath to avoid visible fasteners.
If not, choose a budget-friendly surface like reclaimed wood, a repurposed countertop, or plywood covered with contact paper for a faux granite look.
Cut the bar top to fit your frame, leaving a small overhang for a professional look.
If you chose reclaimed wood, seal and finish with polyurethane or stain for durability.
Step 4: Add Shelving
Cut a 1x12 pine board to the desired length. We picked up a 1x12x8 at Menards for $15. #2 grade or better, surfaced on 4 sides (S4S) because they were going to be visible.
Then we coated our shelf in polyurethane to give it a finished look and make it easy to clean.
We mounted our shelf using these 11" metal brackets, screwing them directly into the studs to support the weights.
The shelf was 6' long and cost $50. If you want multiple shelves or simply want them longer, you can definitely get economies of scale on these materials. As an example, doubling the shelf length and double the number of brackets only increases your cost by 40-50%! 🤯
Step 5: Install a Peel-and-Stick Backsplash
To enhance the look of your basement bar:
Use peel-and-stick backsplash tiles or contact paper to mimic tile or wood paneling.
Attach to the wall or front of the bar for added style.
Pro Tip:
➡️ Check your local dollar store for peel-and-stick backsplash, or faux brick panels or reclaimed pallet wood can create a high-end look for cheap.
Step 6: Paint, Stain, and Decorate
Paint or stain the bar structure to match your basement theme.
Use LED strip lights under the bar top or shelves for a cool effect.
Hang a chalkboard, DIY bar sign, or get a custom neon from Amazon (surprisingly inexpensive) to personalize your space.
Pro Tips:
➡️ Check thrift stores for vintage decor and affordable bar accessories.
➡️ Ask your local hardware stores if they have "oops" paint. You can find great deals on paint mixed incorrectly or returned by customers.
Step 7: Add Seating
No basement bar is complete without seating.
Look for used bar stools on Facebook Marketplace or thrift stores.
Build simple DIY benches from extra 2x4s and plywood for a rustic look.
or order online ready to assemble barstools.
Final Cost Breakdown

Final Thoughts
Building a budget-friendly basement bar for $500 or less is completely possible with smart material choices and some DIY effort. It’s a perfect weekend project that will elevate your home entertaining space without draining your wallet.